21 podcast recording tips for professional episodes

Recording great audio takes some practice, but you can skip a lot of the trial-and-error with these podcast recording tips.
No amount of editing will make terrible source audio sound great, so practice these to-the-point strategies to capture clean podcast recordings from the start.
Great podcast recordings come down to the host’s ability to produce the right sound. These tips are all about creating the perfect recording environment and actionable techniques you can put to use every time you sit down to create an episode.
1. Use the right equipment
You can record a podcast with your laptop’s microphone, but we don’t recommend it. You’ll need a few pieces of podcast equipment to record professional and clear audio. This is the easiest of all our podcast recording tips and it has the biggest impact on your audio quality.
2. Don’t forget to warm up
To state the obvious, recording a podcast episodes requires a bit of talking. Rather than going into your session cold, warm up your mouth and vocal cords by practicing your script or saying a few tongue twisters.
Properly warming up will improve your dictation and keep you from stumbling over words. There’s nothing better than delivering your points flawlessly the first time around.
3. Record in a small, quiet room
Record episodes in the smallest and quietest room possible to reduce outside noise and echoes. Shut your windows and doors, turn off any machines or devices that make a constant noise, and put your pets somewhere they won’t disturb you for a couple hours.
Fill your recording environment with soft items (couches, pillows, carpet, etc.) that absorb sound to muffle any errant noises.
4. Create a brief noise profile
Pause for four or five seconds at the beginning of your recording to create a noise profile. Stay absolutely silent and eliminate all environmental noise.
You can use this moment of silence during editing to identify and remove any background noise by following The Audacity To Podcast’s tutorial on removing noise using Audacity.
5. Adopt proper microphone techniques
First, place your microphone at the same height as your mouth. Then sit a few inches back and have the pop filter between your mouth and the mic. Next, focus on your mouth’s distance from the microphone setup and adjust your body for the desired volume level. Remember, the closer you are the mic, the louder your voice will sound.
While you can alter your voice’s volume level during post-production to keep it consistent, reduce your editing time by keeping your mouth the same distance from the mic while recording.
Pro tip: Having the right microphone isn’t enough, you have to know how to use it. Watch this Podcast Like A Pro video tutorial on how to achieve the perfect mic technique
6. Watch your volume levels
As you keep your microphone distance consistent, you can monitor the volume levels while you record. Most recording softwares display your levels as a scale from green, yellow, to red.
Keep your volume in the green section for your normal conversational tone and yellow sections when you need to add emphasis. Stay out of the red section or your sound will be distorted.
7. Watch your breath
We all need to breathe but controlling the sound of your inhales and exhales will stop any big gusts of wind from sneaking into your recording.
For quieter inhales, sit up straight, try taking smaller breaths, or completely move your mouth away from the mic when you need to take a big breath.
8. Keep your body still
Moving your body around creates background noise while recording. This happens a lot if you use earbud headphones. The wire lays close to your chest which causes the microphone to rub against your shirt and collar.
Try to stay still in your chair with your feet planted. Avoid moving things around on your desk. If you print your notes on paper, move them around as silently as possible too.
READ ALSO: Rapper AJ Nelson Brings out the ‘Guy Guy’ in 2022 with New Single
9. Resolve sound issues early
Make a test recording before you officially start to dive into your episode. If there’s a problem with your guest’s microphone or you can hear construction crew outside, don’t try to power through.
Identify and resolve audio issues from the start or even wait to record. The worst case scenario is recording a full episode only to find there’s a larger issue you can’t fix in editing.
10. Record with headphones (your guest too)
While it’s possible to record a podcast episode without headphones, you’ll probably catch a lot of audio feedback. Have everyone wear headphones so you don’t have to waste precious editing hours cleaning it up.
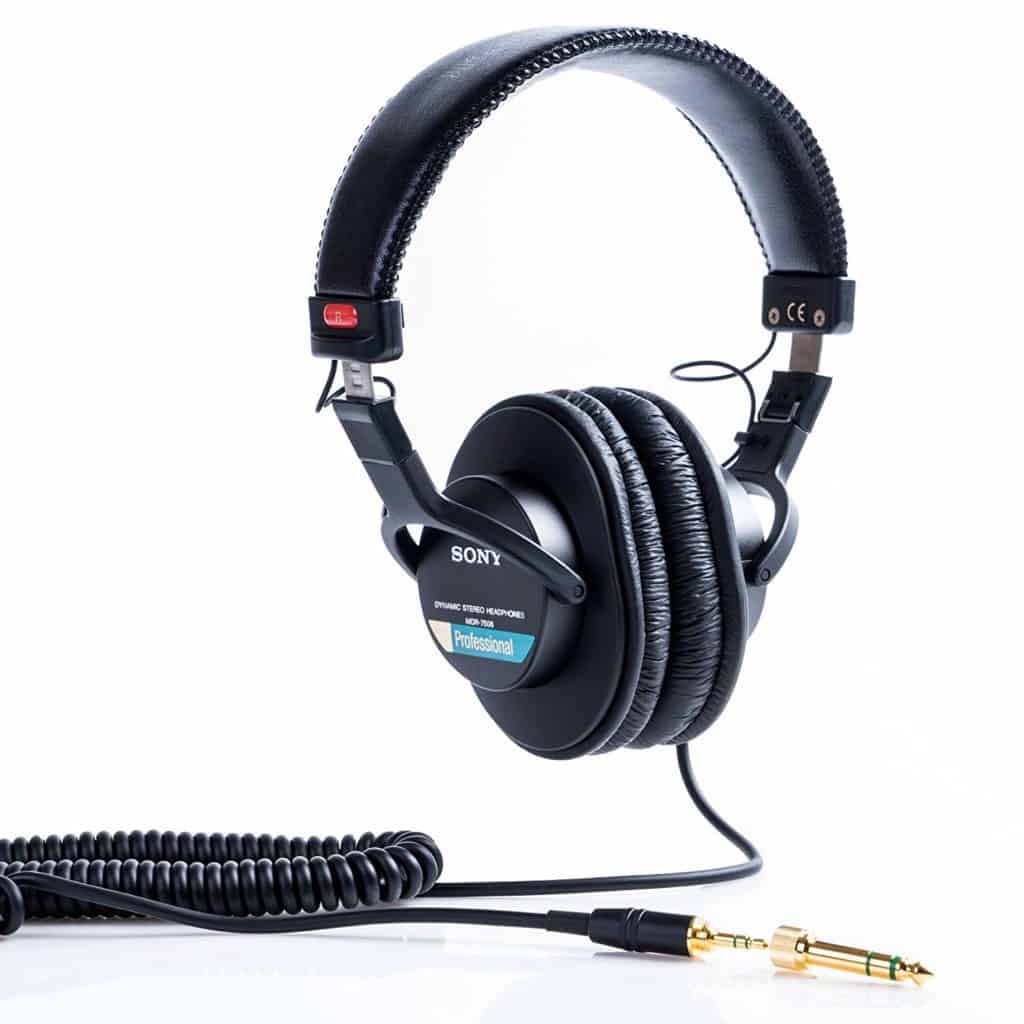
Pro tip: While set of earbud headphones will do, the ones that fully cover the ears are recommended. A favorite pair is from Sony – Sony MDR7506 Headphones.

11. Stay quiet while your guests speak
It’s tempting to drop in simple phrases like “yes” and “right” and “okay” while your guests speak. Those are natural parts of language that we use without realizing, but they can distract your listeners.
Yes, you can remove them during editing, but that’s a lot of unnecessary work. It’s easier to train yourself to limit interjections and allow your guest or co-host to complete their thought.
12. Leave audio cues for mistakes
Mistakes happen. They aren’t stuck in your episode forever because you aren’t performing live. Slicing out mistakes is basic podcast editing, but you need to give yourself a cue to find them in the track.
Fortunately, there are a few ways to do this. You can add a spoken marker where you say “remove the story about the pizza restaurant.” Then give a few second pause and keep going. During editing, find those pauses, and remove the mistakes.
Another option is a high-pitch sound marker, like a dog clicker, that will produce a spike in the volume level. Click it a few times after the mistake occurs then find the spikes when editing.
13. Mute when you aren’t speaking
Save yourself some editing work by muting your microphone when your co-host or guest is speaking. This way you won’t pick up their voice in your microphone and it’s less noise that you’ll have to remove later.
Pro Tip: Every podcaster needs a background noise cancellation tool in their toolbox. Use Krisp to have high quality podcasting experience without background noise and echo. Krisp automatically removes background noises as you’re recording your podcasts or video interviews.
14. Use production elements sparingly
Sound effects have their place. They can add life and uniqueness to your show. But they can also distract and cheapen used them too often. Use sound effects only when the content calls for it and stick to effects that match your brand.
15. Stay hydrated
Drink at least eight ounces of water before you record. This will settle your stomach, loosen your mouth, and help your focus. It’ll also reduce any mouth clicks, the natural clicking and popping noises we make as our mouths dry.
Our stance is it’s better to drink more water and pause to use the bathroom once or twice than suffer the effects of dehydration.
16. Record a separate channel for each person
If you have multiple people speaking on your show, record each on their own channel. This will give you control over their individual volumes and noise profiles during editing.
You can have each person record themselves on their own computer (sometimes called a “double ender”) or use recording software with a multi-track recording feature.
If you use Zoom to record remote interviews, check out the video tutorial on how to record separate channels:
17. Record under a blanket
If you’re stuck in a noisy environment, an easy way to eliminate background noise is to drape a blanket over you and your microphone. It’s a crude technique, but it works. This is useful if you’re forced to record in a busy hotel, your car, or apartment building.
18. Don’t be afraid to take a break
Try breaking your show into segments with logical places for you to take a break. It’s perfect time double check the audio for any issues, grab more water, and stretch to stay loose for your entire recording session.
Breaks are also good opportunities to discuss what’s next with your co-host or guest. You can plan your conversation, review notes, and even rehearse.
READ ALSO: What you need to know about Nigeria’s ban on foreign models
19. Maximize your internet bandwidth
If you’re conducting an interview or conversation over the internet, it’s vital that you boost your connection as much as possible. This will improve the quality of the audio your recording software captures.
How do you increase your bandwidth? Well, other than upgrading with your internet provider, all you can do is plug directly into your router (instead of connecting wirelessly) and close any application that uses the web that you don’t absolutely need.
Make sure to instruct your guests to sit in a place with a strong connection and plug directly into their router if possible too.
Pro tip: Run a speed test for your internet connection to check the bandwidth using this free resource. Generally, a good internet speed is at or above 25 Mbps.
20. Trust your ears and take notes
The bottom line is trust your ears and don’t over think it. Although just about everyone hates the sound of their own voice initially, it’s important to listen to everything you record.
When you playback the audio files, follow your instincts when something sounds off. As you produce more episodes and start liking the final cut, take notes of the recording setup and work to mimic it each time you get behind the mic.
21. Don’t forget about the content
The cleanest, most professional sounding recording is all for nothing it doesn’t contain engaging content. In addition to focusing on your technique, don’t forget to spend time on understanding what makes a podcast episode interesting.
While an unpolished recording can turn off new listeners, a podcast that isn’t compelling will deter even the most loyal fan.
Source: Castos
Abeeb Lekan Sodiq is a Managing Editor & Writer at theafricandream.net. He is as well a Graphics Designer and also known as Arakunrin Lekan.


